Custom commands are a way to extend the functionality of CSMM and completely tailor your experience per server. The syntax for these is used inside custom commands, hooks and the gimme command.
The combination of CSMM and CPM allows you to create some truly unique and powerful custom commands for players. Some of these commands are part of CPM directly, but by restricting access to the command and then enabling it via CSMM instead, you can make the commands role-specific, place cooldowns on them, charge currency for their use, or any combination of the above.
# Getting started tutorial
This tutorial will teach you the basics of the system. After this guide, you will be able to get started writing your own commands.
TIP
The examples will assume you have set $ as the prefix. You can change the prefix in your ingame commands settings.
# Hello world
To create a custom command, you must choose a name for your command. This is what players will type to trigger the command. For example: you select "helloworld" as name, then you will type "$helloworld" ingame to trigger it. Next, you need to enter the command(s) that will be executed on your server. This can be any console command that is available from remote sources. (layman's terms: if you can execute the command via telnet, you can use it).
say "Hello world!"
Now you can go ingame and try it out!
WARNING
Note: If a custom command has same name as an existing CSMM command, the existing CSMM command will always take precedence. the custom command never gets executed.
# Built-in variables
You can add dynamic values to your commands. This is useful if you need to do something specific to the executing player like PMing the reply instead of a global message. Let's extend our hello world command. Every variable looks like this: "${variableName}". This might look familiar to people who know about template literals (opens new window). When a command is executed, CSMM will look for exact matches to the built-in variables (capitalization matters!). If found, it will replace the variable with the value relating to the executing player. So if you use ${player.entityId}, it will be replaced by the Steam ID of the player who triggered the command.
pm ${player.entityId} "Hello world"
Great! The server sent us a PM instead of displaying the message to everyone on the server.
# Variables
CSMM populates the data of custom commands, you can access these variables with
- ${date},
- ${time},
- ${player.name},
- ${server.ip},
- ${player.positionX},
- ...
See the list below for a list of all available variables with examples of their contents
{
  "date": "2019-03-16",
  "time": "16:18:46",
  "uptime": "612525.066",
  "msg": "Executing command 'w2l testing' by Telnet from 127.0.0.1:37284",
  "trace": "",
  "type": "Log",
  "player": {
    "createdAt": 1552652314408,
    "updatedAt": 1552753112921,
    "id": 1,
    "steamId": "76561198028198341",
    "entityId": 171,
    "ip": "192.168.1.1",
    "country": "BE",
    "currency": 30,
    "avatarUrl": "",
    "name": "Catalysm",
    "positionX": 1886,
    "positionY": 83,
    "positionZ": 1866,
    "inventory": null,
    "playtime": 39645,
    "lastOnline": "2019-03-16T14:35:52Z",
    "banned": false,
    "deaths": 0,
    "zombieKills": 27,
    "playerKills": 0,
    "score": 27,
    "level": 18,
    "lastTeleportTime": "2019-03-15 13:17:44.245",
    "lastDeathLocationX": -352,
    "lastDeathLocationY": 57,
    "lastDeathLocationZ": 1328,
    "server": 1,
    "user": 1,
    "role": 1
  },
  "server": {
    "createdAt": 1552652314131,
    "updatedAt": 1552750573472,
    "id": 1,
    "name": "CSMM Dev",
    "ip": "192.168.0.1",
    "webPort": 28005
  }
}
# Multiple commands
To execute several commands inside one custom command, you have to separate them with ";".
pm ${player.entityId} "Hello world"; pm ${player.entityId} "Here's a second command!"
That's it! You're done! You now have a grasp on the basics. Check out some configuration examples if you need some inspiration.
# Advanced
# Custom arguments
Let's make our hello world command a bit more dynamic and add the players name to the greeting.
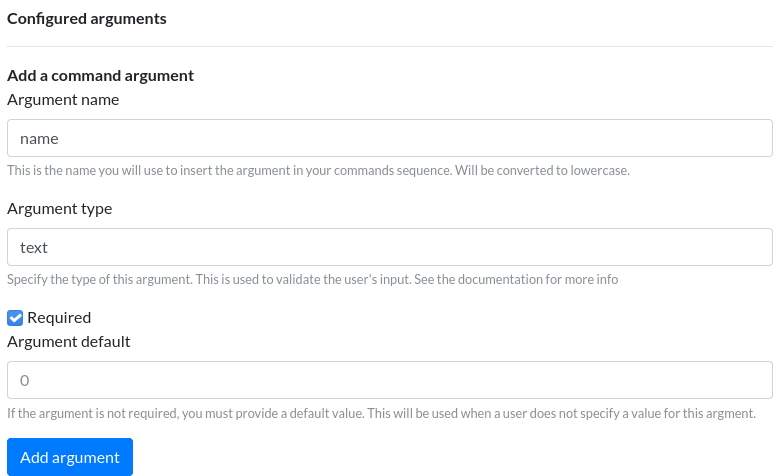
Argument name is what you will use to substitute the value in your command. In the example, we will use ${name} Argument type is used for validation An argument can be required or optional. If you deselect required, you must provide a default value.
pm ${player.entityId} "Hello ${name}"
As you can see, when we pass a parameter "dave" to the command, it will say hello to Dave! When we do not add a parameter, it will use the default value.
# Special Variables
- ${randNum:start:end}
- ${randList:item1,item2,item3}
# ${randNum:min:max}
Generates a random number between min and max (inclusive) every time its encountered
For example, "${randNum:5:10} ${randNum:5:10} ${randNum:5:10}" would generate 3 random numbers
# ${randList:item1,item2,item3...}
Picks a random item fom the list of provided items its encountered
For example, "${randList:apple,orange,grape} ${randList:apple,orange,grape}" could produce "apple grape"
# Legacy variables
WARNING
These were the first variables added to CSMM. They are still in the application for backwards compatibility, but it is recommended to use the new syntax (eg ${player.entityId})
- ${steamId}
- ${entityId}
- ${playerName}
- ${balance}
- ${posX}
- ${posY}
- ${posZ}
# Examples
# Remove Near Death Trauma Debuff
NDT is a debuff applied to players when they die. It temporarily lowers some of their stat and perk counts by 1 or more points depending on how many times they've died recently. This command will remove the debuff completely, returning them back to normal health and stats. This version of the command below sends a message to the player shortly before removing the debuff. The message is colored via the hex color picker (opens new window) feature in CPM. In this case, the color is a light teal (29bbaf), and the message is shown to come from 'Your Server Name' as a PM.
Command:
cpm-sayplayer2 "[29bbaf]Your Server Name[-]" ${entityId} "[29bbaf]The server will remove your Near Death Trauma Debuff now![-]" ; debuffplayer ${entityId} buffNearDeathTrauma
# Get Vehicle
Requires CPM 7.1 or higher.
CPM includes a set of commands related to summoning a vehicle. For example, the command 'getbike' can be run by an admin, followed by a Steam ID, and the server will teleport the minibike owned by that Steam ID to the admin who runs the command. There are equivalent commands (getgyrocopter, getbicycle, etc.) for each type of vehicle. The Get Vehicle custom command combines them all into one command that can be run by any player who has permission, and will automatically summon only their own vehicles to them. This command requires you to add a custom argument to the command that you create in order to capture which type of vehicle the user is summoning.
Command:
cpm-get${vehtype} ${entityId}
Argument Settings:
- Name: vehtype
- Type: text
- Required: yes
- Default value: bike
How does this command work? Users will type the command like this:
/gv bike
CSMM will combine the letters 'cpm-get' with whatever the users typed after '/gv' and the result will become a new command that is executed via console. For example:
'/gv motorcycle' will become 'cpm-getmotorcycle', followed by the user's Steam ID: cpm-getbike 76561197961408188
If the user were to type '/gv smith', the server would attempt to execute 'cpm-getsmith', which would fail.
An example command for players to retreive their own vehicle would look like this
getjeep ${player.entityId}
# User-Created Advanced Claims
Requires CPM 8.1.1 or higher.
In A17, the land claim protection block is less useful than it was in A16 since you can only have one now. Without it, however, zombies will be able to spawn in your base at random and during horde night. An alternative to the LCB is to use Advanced Claims to mark a region on the map where only the owner, and anyone they choose, are permitted to enter. Typically, however, Advanced Claims must be created by an admin; this command works around that. When a player runs it, it automatically creates an Advanced Claim with a radius of 20 around where the player is standing, and then whitelists the player's friends to be able to enter the area.
There are several protections in place with this command to prevent abuse by the player by spamming it to block large regions of the map off.
- Each time the player runs the command, it erases the previous Advanced Claim areas before creating the new one.
- A player can't execute this command if the newly-created Advanced Claim would overlap an existing Advanced Claim from another player, similar to how opposing LCBs cannot be placed in proximity.
- Within CSMM's Custom Command options, you can place a price, cooldown, or role restriction on this command.
Leaving the radius at 20 will mimic the size of a standard LCB radius. Note the second 'ccc radius' command; this places an additional hostileFree claim atop the base advanced claim, preventing zombies from spawning any closer than a short distance away from the base. Additionally, any zombies that wander too close to the base will simply disappear. Deleting the second 'ccc remove ' and 'ccc radius 30' lines will simply create a player-protected area but still allow zombies in. Be aware that with the hostileFree zone created, you will not be able to fight zombies near your base; they will simply disappear without giving you XP.
Commands:
ccc remove ${steamId}_mybase_norm;
ccc remove ${steamId}_mybase_hfree;
ccc radius 20 ${steamId} ${steamId}_mybase_norm 1;
wlf add ${steamId};
ccc radius 30 ${steamId} ${steamId}_mybase_hfree 1 hostilefree;
pm ${steamId} "Base safe zone created. All of your friends have been whitelisted automatically."
# addCurrency custom command(playerId, amount)
How to pay a player currency from an ingame command. This command will allow you to give another player some amount of CSMM currency.
Create a new custom command with the command
addCurrency(${steam},${amount})
You will also need 2 arguments
- Argument name "steam" type "text"
- Argument name "amount" type "text"
Additionally you can send yourself a pm saying who you paid to and how much by adding this line to the end
pm ${player.entityId} "You have just sent ${amount} to ${steam}"
The final command is
addCurrency(${steam},${amount});pm ${player.steamId} "You have just sent ${amount} to ${steam}"
# Teleport to last death
A custom command to teleport the player back to where they last died (works even if no backpack was dropped)
Command:
teleportplayer ${player.entityId} ${player.lastDeathLocationX} ${player.lastDeathLocationY} ${player.lastDeathLocationZ}
You may want to give this command a cost, or allow it only for players with a specific role.