# Server setup
# OS Download & boot media preparation
Congratulation! You've obtained all hardware and assembled server of your dream.
In this section we will install Ubuntu server 18.04LTS Server OS. You need to visit https://www.ubuntu.com/#download (opens new window) and download server software with LTS mark. LTS is Long Term Support, means you have many years ahead with no need to change OS version. Download size is less then 1 GB, but you need a 4GB or larger USB flash to install software
When download finished, prepare bootable USB flash from acquired ISO file, according to the instructions (opens new window)
Alternatively, tutorials available to help you create a bootable USB stick from both Ubuntu (opens new window) and Apple macOS (opens new window).
# Installing server operating system
This process is well described in docs (opens new window)
Installation process is very easy.
- Language (choose english) (1/11)
- Keyboard layout (choose english) (2/11)
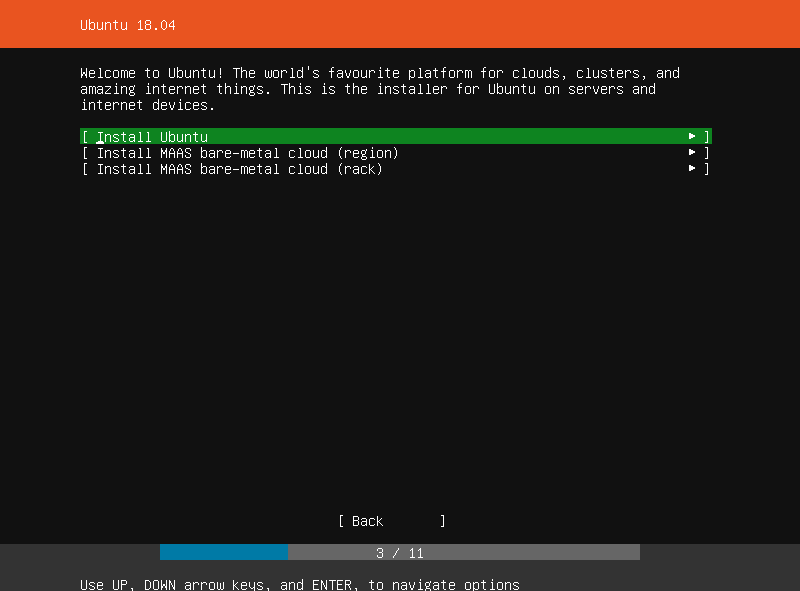
- "Install Ubuntu" (3/11)
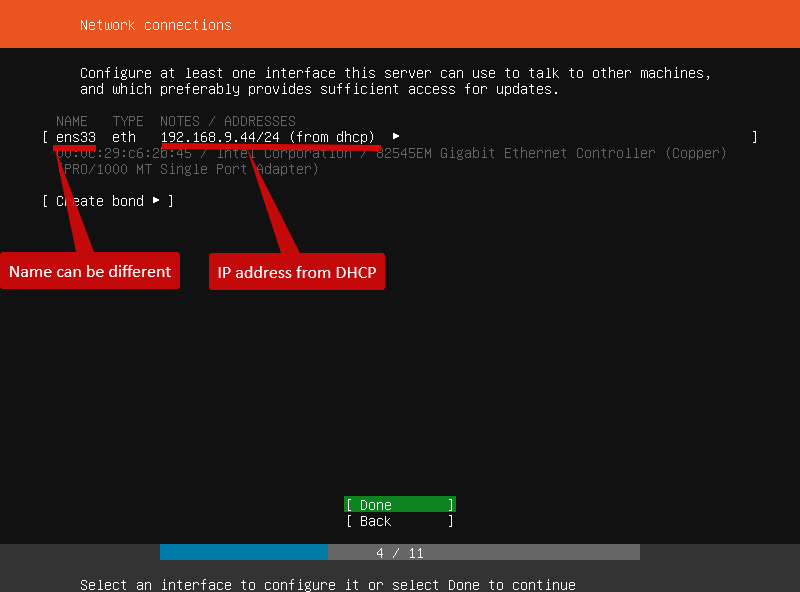
- Check network address (will be detected automaticaly if DHCP enabled (4/11)
- Proxy (no proxy in home network in 99.9999%, skip it) (5/11)
- Download mirror (choose default) (6/11)
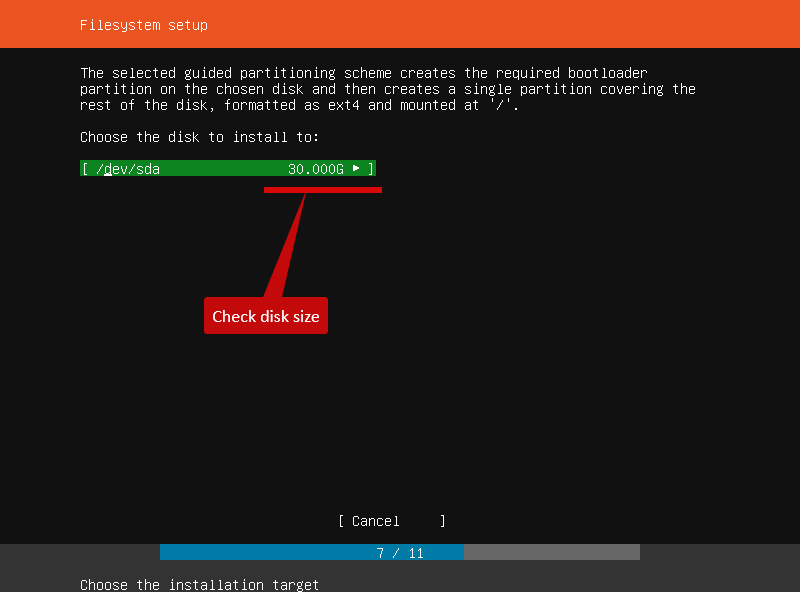
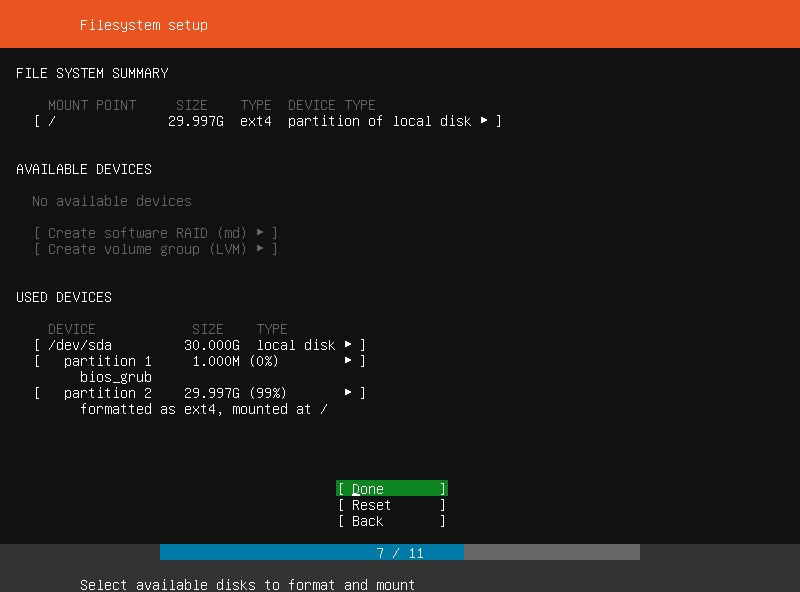
- "Use entire disk" (if you want to use all available space) and confirm disk partitioning. Do NOT use LVM (7/11)
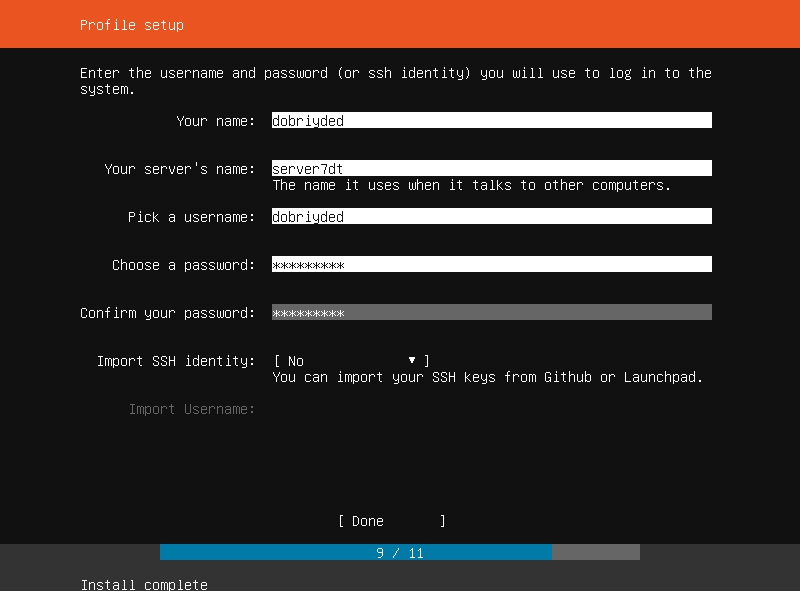
- Choose name/username (enter same name, all in lowercase).
Choose server name. It MUST start from lowercase english letter and consist only from of "a-z" "A-Z" "_" "-" ) This means "7DTDServer" is not allowed name. "server7dt" is OK. (9/11) - Server snaps. Do not select, chose "done"to continue
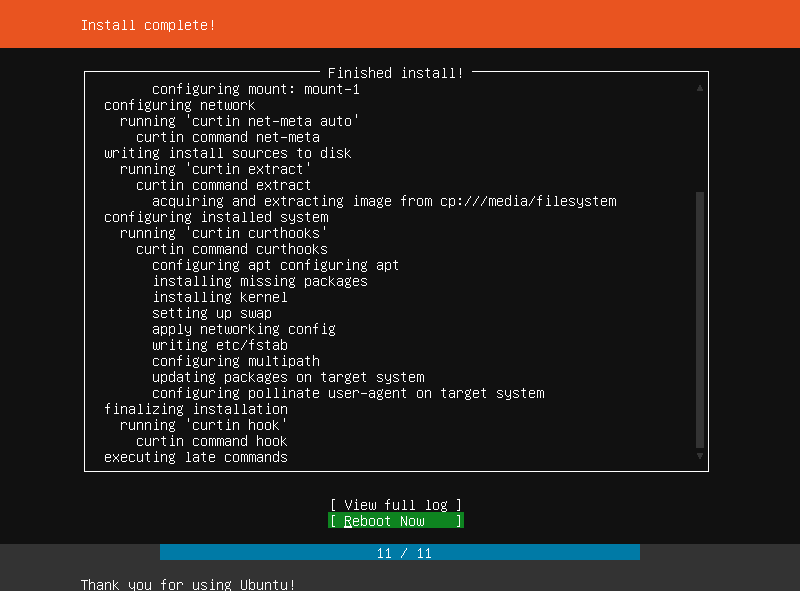
- Install finished! Choose "reboot now"
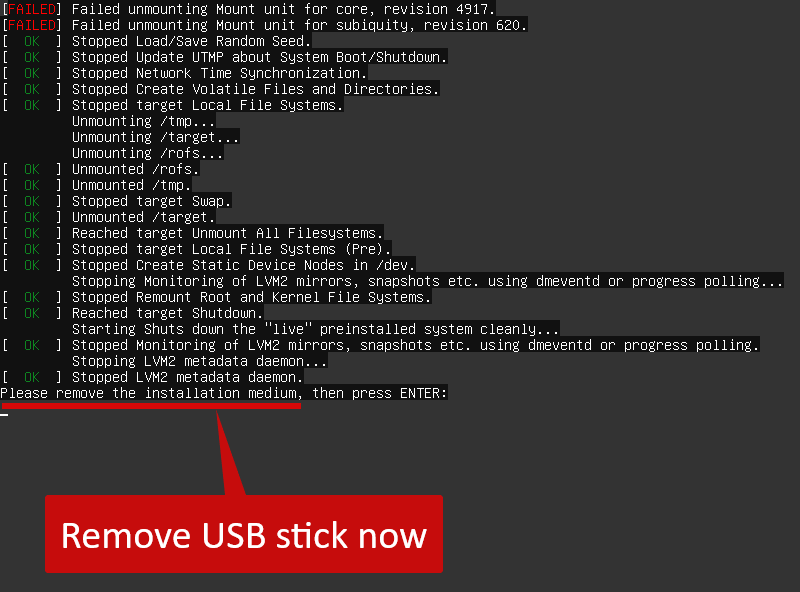
- When you prompted to remove USB stick, do it and press enter
# OS configuration and updates
# First login
After OS installation and reboot, you will see a lot of text, finished by login prompt. Enter username, specified in setup process. If you cannot see login prompt, try to press "enter"
Ubuntu 18.04.1 LTS server7dt tty1

server7dt login: dobriyded
Password: *************
After login process you will see some something like this
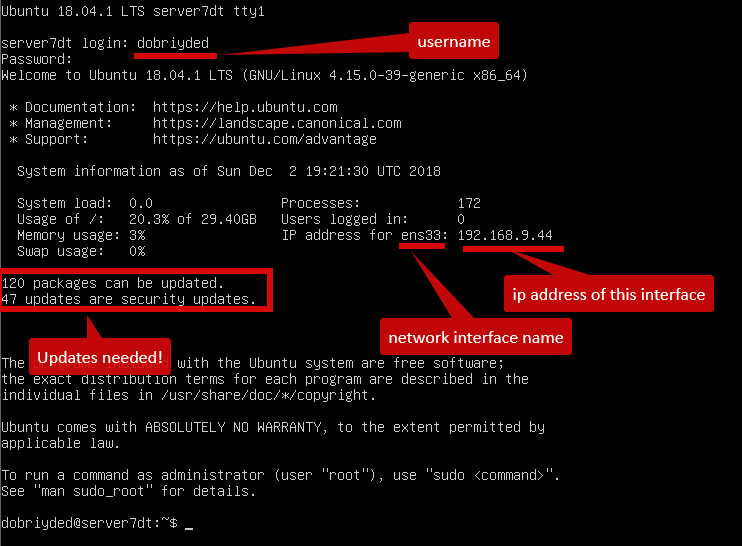
At this moment, if you have problems with network (IP address is not recieved by DHCP or whatever), its time to fix it. Documentation from Ubuntu (opens new window)
Starting from version 18 Ubuntu have another network configuration method (netplan), different from earlier versions. Please check documentation for version 18!
TIP
Its time to reserve local(LAN) IP address to be always associated with this server. You can:
- Either set static IP in Ubuntu using netplan, as seen in https://help.ubuntu.com/lts/serverguide/network-configuration.html (opens new window)
- Either set IP as static for designated server network adapter in your router/DHCP configuration (check router manual for details).
# Update repository list
Repository list should be updated to use 3-rd party application
Use command : sudo add-apt-repository universe
Example
dobriyded@server7dt:~$ sudo add-apt-repository universe
\[sudo\] password for dobriyded:
'universe' distribution component enabled for all sources.
Hit:1 http://archive.ubuntu.com/ubuntu bionic InRelease
Get:2 http://archive.ubuntu.com/ubuntu bionic-security InRelease \[83.2 kB\]
Get:3 http://archive.ubuntu.com/ubuntu bionic-updates InRelease \[88.7 kB\]
Get:4 http://archive.ubuntu.com/ubuntu bionic/universe amd64 Packages \[8,570 kB\]
Get:5 http://archive.ubuntu.com/ubuntu bionic/universe Translation-en \[4,941 kB\]
Get:6 http://archive.ubuntu.com/ubuntu bionic-security/universe amd64 Packages \[99.1 kB\]
Get:7 http://archive.ubuntu.com/ubuntu bionic-security/universe Translation-en \[55.7 kB\]
Get:8 http://archive.ubuntu.com/ubuntu bionic-updates/main amd64 Packages \[451 kB\]
Get:9 http://archive.ubuntu.com/ubuntu bionic-updates/universe amd64 Packages \[585 kB\]
Get:10 http://archive.ubuntu.com/ubuntu bionic-updates/universe Translation-en \[160 kB\]
Fetched 15.0 MB in 4s (3,638 kB/s)
Reading package lists... Done
Now we need to update our server with latest patches.
# Patch repository check and update
To check for latest available patches use command sudo apt-get update
sudo apt-get update
Example:
dobriyded@server7dt:~$ sudo apt-get update
\[sudo\] password for dobriyded:
Hit:1 http://archive.ubuntu.com/ubuntu bionic InRelease
Get:2 http://archive.ubuntu.com/ubuntu bionic-security InRelease \[83.2 kB\]
Get:3 http://archive.ubuntu.com/ubuntu bionic-updates InRelease \[88.7 kB\]
Get:4 http://archive.ubuntu.com/ubuntu bionic/main Translation-en \[516 kB\]
Get:5 http://archive.ubuntu.com/ubuntu bionic-security/main Translation-en \[82.1 kB\]
Get:6 http://archive.ubuntu.com/ubuntu bionic-updates/main Translation-en \[167 kB\]
Fetched 937 kB in 1s (913 kB/s)
Reading package lists... Done
If you not received any errors after command completion, you network seems to be configured correctly.
# Download and install updates
Use command sudo apt-get dist-upgrade
Example:
dobriyded@server7dt:~$ sudo apt-get dist-upgrade
Reading package lists... Done
Building dependency tree
Reading state information... Done
Calculating upgrade... Done
The following NEW packages will be installed:
  libuv1
The following packages will be upgraded:
  amd64-microcode apparmor apport apt apt-utils base-files bind9-host bsdutils cloud-init cloud-initramfs-copymods
  cloud-initramfs-dyn-netconf console-setup console-setup-linux cryptsetup cryptsetup-bin curl distro-info-data dnsutils dpkg
  fdisk friendly-recovery gcc-8-base gettext-base git git-man grub-common grub-pc grub-pc-bin grub2-common initramfs-tools
  initramfs-tools-bin initramfs-tools-core intel-microcode keyboard-configuration kmod libapparmor1 libapt-inst2.0 libapt-pkg5.0
  libbind9-160 libblkid1 libcryptsetup12 libcurl3-gnutls libcurl4 libdns-export1100 libdns1100 libfdisk1 libgcc1 libglib2.0-0
  libglib2.0-data libirs160 libisc-export169 libisc169 libisccc160 libisccfg160 libkmod2 libldap-2.4-2 libldap-common liblwres160
  liblxc-common liblxc1 libmount1 libmspack0 libnss-systemd libpam-systemd libparted2 libplymouth4 libpython3-stdlib libpython3.6
  libpython3.6-minimal libpython3.6-stdlib libsmartcols1 libstdc++6 libsystemd0 libudev1 libuuid1 libx11-6 libx11-data libxml2
  linux-firmware linux-signed-generic lshw lxcfs lxd lxd-client man-db mount networkd-dispatcher open-iscsi open-vm-tools
  openssh-client openssh-server openssh-sftp-server overlayroot parted plymouth plymouth-theme-ubuntu-text python-apt-common
  python3 python3-apport python3-apt python3-distupgrade python3-gdbm python3-minimal python3-problem-report python3-requests
  python3-software-properties python3-update-manager python3.6 python3.6-minimal software-properties-common sosreport systemd
  systemd-sysv tzdata ubuntu-keyring ubuntu-release-upgrader-core udev unattended-upgrades update-manager-core
  update-notifier-common util-linux uuid-runtime
122 upgraded, 1 newly installed, 0 to remove and 0 not upgraded.
Need to get 112 MB of archives.
After this operation, 889 kB of additional disk space will be used.
Do you want to continue? \[Y/n\]
As you can see, we need 112MB download and 889 kb (less then 1 MB) more of disk space. Just compare it to Windows update size !
Press "enter" or "Y" to continue. Lots of text wll be displayed. Wait patiently for some time and it will be finished. Some warnings possibly can occur, its no big deal, its usualy can be ignored.
Wait for system returns to normal prompt. It looks like username@servername:~$ (in my case: dobriyded@server7dt:~$ )
# Setting up remote access
One of the biggest advantages of Ubuntu for using as 7DTD gameserver (comparing to windows) is an ability to set remote access and:
- Get rid of keyboard, mouse and monitor
- Be able to use a phone or tablet to control
- To feel true Linux power in remote control without need of windows cumbersome 3-rd paty remote access apps (teamviewer etc) and flawed RDP
Yes, we use SSH!
Ubuntu server 18.04 have SSH from the box, no need to install anything.
To continue, server IP address is needed. Did you set static IP as i've said before??? If not, return to page start for instructions. If you are not remember IP, it can be asily accessed by using command **ip a **
dobriyded@server7dt:~$ ip a
1: lo: <LOOPBACK,UP,LOWER\_UP> mtu 65536 qdisc noqueue state UNKNOWN group default qlen 1000
    link/loopback 00:00:00:00:00:00 brd 00:00:00:00:00:00
    inet 127.0.0.1/8 scope host lo
       valid\_lft forever preferred\_lft forever
    inet6 ::1/128 scope host
       valid\_lft forever preferred\_lft forever
2: ens33: <BROADCAST,MULTICAST,UP,LOWER\_UP> mtu 1500 qdisc fq\_codel state UP group default qlen 1000
    link/ether 94:de:80:ce:d2:c7 brd ff:ff:ff:ff:ff:ff
    inet 192.168.9.44/24 brd 192.168.9.255 scope global enp2s0
       valid\_lft forever preferred\_lft forever
    inet6 fe80::96de:80ff:fece:d2c7/64 scope link
       valid\_lft forever preferred\_lft forever
As you can see above, IP address is 192.168.9.44
To connect remotely to server, you need any SSH client, server IP address and network connection between them. Its easy!
- Start SSH client programm
- Create new SSH connection
- Select server IP address and press "connect".
In connection window you can see the SAME login promt, we met before on monitor.
When SSH connection with server established, you no longer need monitor, keyboard and mouse to be attached to server.
WARNING
Before unconnecting keyboard,mouse and monitor, check BIOS setting for server machine. You need to disable "F1 prompt for any error" to ensure server will boot even it's not detect keyboard (yes, its a error!).
Do not skip following step! After changes are made, shutdown machine, disconnect keyboard and mouse, turn server on. Check monitor to ensure boot process is completed and system is booted normaly till the login prompt.
Re-connect keyboard and shutdown server. Disconnect all devices, including monitor. You must leave only powercord and network patchcord connected. Turn server on. After a few minutes check SSH network connection available.
# Open file limit
From my experience of ARK server management, it useful to increase open files limit (rest of article is taken from https://ark.gamepedia.com/Dedicated_Server_Setup#Post-Setup_Management (opens new window) )
To ensure that the host's open files limit is high enough to support the game server:
Add the following lines to /etc/sysctl.conf
fs.file-max=100000
then run the following command via sudo or a root shell to apply the change:
sudo sysctl -p /etc/sysctl.conf
Add the following lines to /etc/security/limits.conf
\* soft nofile 1000000
\* hard nofile 1000000
Add the following line to /etc/pam.d/common-session
session required pam_limits.so
Warning: Without these changes, the game server may not successfully launch. If the server appears to start, but uses a high amount of CPU time without using at least 5.5GB of RAM, it hasn't been able to open all the files it needs and the above change should be applied.
Tuned
is a daemon that monitors the use of system components and dynamically tunes system settings, currently only on RHEL7, CentOS7.x, and Fedora.
Note: You need to set tuned to „throughput-performance“. Otherwise all changes in /etc/security/limits.conf will ignored!
# Installation of gameserver software and scripts
We reach the point, where operating system is installed, remote access is set up. Now we can proceed to installing gameserver and additional scripts. To make our server as lightweight as possible, we install 7dtd dedicated server (its different app from 7dtd game) using Valve's STEAMcmd (opens new window) with help of LinuxGameServerManager (opens new window) scripts. Process is really short, easy and INCORRECTLY described in 7DTD section of LinuxGSM site here https://linuxgsm.com/lgsm/sdtdserver/ (opens new window)
# Installing all prerequisites
issue command: sudo dpkg --add-architecture i386; sudo apt update; sudo apt install mailutils postfix curl wget file bzip2 gzip unzip bsdmainutils python util-linux ca-certificates binutils bc jq tmux lib32gcc1 libstdc++6 libstdc++6:i386 telnet expect
This is ONE long string! you need to enter it at once.
You will be prompted for '[Y/n]' to install, answer 'Y'
When "colored" part of install (Postfix configuration) comes to screen, just answer default answer ('Internet site' , enter, enter)
To view example of system output
dobriyded@server7dt:~$ **sudo dpkg --add-architecture i386; sudo apt update; sudo apt install mailutils postfix curl wget file bzip2 gzip unzip bsdmainutils python util-linux ca-certificates binutils bc jq tmux lib32gcc1 libstdc++6 libstdc++6:i386 telnet expect**

Hit:1 http://archive.ubuntu.com/ubuntu bionic InRelease
******************** LOT OF DATA CUT ********************
Reading package lists... Done
Building dependency tree
Reading state information... Done
All packages are up to date.
Reading package lists... Done
Building dependency tree
Reading state information... Done
bc is already the newest version (1.07.1-2).
******************** LOT OF DATA CUT ********************
The following additional packages will be installed:
binutils-common binutils-x86-64-linux-gnu gcc-8-base:i386 guile-2.0-libs libbinutils libc6:i386 libc6-i386 libgc1c2
******************** LOT OF DATA CUT ********************
python2.7-minimal ssl-cert tcl-expect tcl8.6
Suggested packages:
binutils-doc tk8.6 glibc-doc:i386 locales:i386 mailutils-mh mailutils-doc procmail postfix-mysql postfix-pgsql postfix-ldap
postfix-pcre postfix-lmdb postfix-sqlite sasl2-bin dovecot-common resolvconf postfix-cdb postfix-doc python-doc python-tk
python2.7-doc binfmt-support openssl-blacklist tcl-tclreadline zip
The following NEW packages will be installed:
binutils binutils-common binutils-x86-64-linux-gnu expect gcc-8-base:i386 guile-2.0-libs jq lib32gcc1 libbinutils libc6:i386
******************** LOT OF DATA CUT ********************
mysql-common postfix python python-minimal python2.7 python2.7-minimal ssl-cert tcl-expect tcl8.6 unzip
0 upgraded, 39 newly installed, 0 to remove and 0 not upgraded.
Need to get 20.5 MB of archives.
After this operation, 95.6 MB of additional disk space will be used.
Do you want to continue? **[Y/n]**
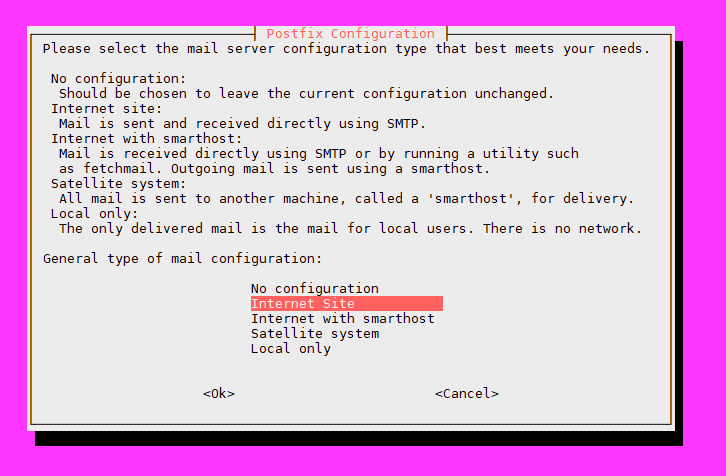

Wait for progress bar to reach 100% and installation is finished. Command prompt (dobriyded@server7dt:~$) appears
Do you want to continue? **[Y/n]**
Selecting previously unselected package lib32gcc1.
Preparing to unpack .../32-lib32gcc1_1%3a8.2.0-1ubuntu2~18.04_amd64.deb ...
Unpacking lib32gcc1 (1:8.2.0-1ubuntu2~18.04) ...
Processing triggers for ufw (0.35-5) ...
Processing triggers for mime-support (3.60ubuntu1) ...
Processing triggers for ureadahead (0.100.0-20) ...
Setting up mysql-common (5.8+1.0.4) ...
update-alternatives: using /etc/mysql/my.cnf.fallback to provide /etc/mysql/my.cnf (my.cnf) in auto mode

**Progress: [ 63%]** [####################################################################..
********** COUPLE OF MINUTES LATER **********
update-alternatives: using /usr/bin/dotlock.mailutils to provide /usr/bin/dotlock (dotlock) in auto mode
update-alternatives: using /usr/bin/mail.mailutils to provide /usr/bin/mailx (mailx) in auto mode
Setting up binutils (2.30-21ubuntu1~18.04) ...

Setting up libgcc1:i386 (1:8.2.0-1ubuntu2~18.04) ...
Setting up libc6:i386 (2.27-3ubuntu1) ...
Setting up libstdc++6:i386 (8.2.0-1ubuntu2~18.04) ...
Processing triggers for libc-bin (2.27-3ubuntu1) ...
Processing triggers for systemd (237-3ubuntu10.9) ...
Processing triggers for ureadahead (0.100.0-20) ...
Processing triggers for rsyslog (8.32.0-1ubuntu4) ...
Processing triggers for ufw (0.35-5) ...
**dobriyded@server7dt:~$**
To help yourself in some monitoring task, install some useful additional software by issuing command: sudo apt install atop htop mc
You will be prompted for '[Y/n]' to confirm install, answer 'yes'
Wait for command prompt (dobriyded@server7dt:~$) to appear
dobriyded@server7dt:~$ **sudo apt install atop htop mc**
Reading package lists... Done
Building dependency tree
Reading state information... Done
htop is already the newest version (2.1.0-3).
The following additional packages will be installed:
libssh2-1 mc-data
Suggested packages:
arj catdvi | texlive-binaries dbview djvulibre-bin genisoimage gv imagemagick libaspell-dev links | w3m | lynx odt2txt
poppler-utils python-boto python-tz xpdf | pdf-viewer zip
The following NEW packages will be installed:
atop libssh2-1 mc mc-data
0 upgraded, 4 newly installed, 0 to remove and 0 not upgraded.
Need to get 1,916 kB of archives.
After this operation, 7,918 kB of additional disk space will be used.
**Do you want to continue? \[Y/n\]**
Get:1 http://archive.ubuntu.com/ubuntu bionic/universe amd64 atop amd64 2.3.0-1 \[132 kB\]
Get:2 http://archive.ubuntu.com/ubuntu bionic/universe amd64 libssh2-1 amd64 1.8.0-1 \[73.2 kB\]
Get:3 http://archive.ubuntu.com/ubuntu bionic/universe amd64 mc-data all 3:4.8.19-1 \[1,238 kB\]
Get:4 http://archive.ubuntu.com/ubuntu bionic/universe amd64 mc amd64 3:4.8.19-1 \[474 kB\]
Fetched 1,916 kB in 1s (1,365 kB/s)
Selecting previously unselected package atop.
(Reading database ... 105369 files and directories currently installed.)
Preparing to unpack .../atop\_2.3.0-1\_amd64.deb ...
Unpacking atop (2.3.0-1) ...
Selecting previously unselected package libssh2-1:amd64.
Preparing to unpack .../libssh2-1\_1.8.0-1\_amd64.deb ...
Unpacking libssh2-1:amd64 (1.8.0-1) ...
Selecting previously unselected package mc-data.
Preparing to unpack .../mc-data\_3%3a4.8.19-1\_all.deb ...
Unpacking mc-data (3:4.8.19-1) ...
Selecting previously unselected package mc.
Preparing to unpack .../mc\_3%3a4.8.19-1\_amd64.deb ...
Unpacking mc (3:4.8.19-1) ...
Setting up atop (2.3.0-1) ...
Created symlink /etc/systemd/system/multi-user.target.wants/atop.service → /lib/systemd/system/atop.service.
Created symlink /etc/systemd/system/multi-user.target.wants/atopacct.service → /lib/systemd/system/atopacct.service.
Processing triggers for mime-support (3.60ubuntu1) ...
Processing triggers for ureadahead (0.100.0-20) ...
Setting up mc-data (3:4.8.19-1) ...
Setting up libssh2-1:amd64 (1.8.0-1) ...
Processing triggers for libc-bin (2.27-3ubuntu1) ...
Processing triggers for systemd (237-3ubuntu10.9) ...
Setting up mc (3:4.8.19-1) ...
Processing triggers for man-db (2.8.3-2ubuntu0.1) ...
**dobriyded@server7dt:~$**
# Creating user to maintain 7DTD gameserver
After then we creating user for 7DTD gameserver with separate home directory to store server-related files. If you want to create 2-nd or 3-rd gameserver on this PC, you can add another users, with different names (sdtdserver1, sdtdserver2 for example) to store separate server files copy. Just make sure you'r hardware can handle it
Issue command: sudo adduser sdtdserver
'sdtd' in username 'sdtduser' means '7 days to die'. Do you remember, 1-st letter of username cannot be digits? So, no '7dtd...' users only 'sdtd....'
After issuing commands starting with sudo , system can ask you a password for main user. Do not confuse!
Password request looks like [sudo] password for dobriyded:
Enter password and it will not bother you by this question again for some time
After sudo adduser sdtdserver you will be prompted to enter some data:
- New user (sdtdserver) password
- Confirm password
- Full Name (just press enter)
- Room number (just press enter)
- Work phone (just press enter)
- Home Phone (just press enter)
- "Other" datafield (just press enter)
- "Is the information correct? [Y/n]" (just press enter)
Example:
dobriyded@server7dt:~$ sudo adduser sdtdserver
\[sudo\] password for dobriyded: \*\*\*\*\*\*\*\*\*\*
Adding user \`sdtdserver' ...
Adding new group \`sdtdserver' (1001) ...
Adding new user \`sdtdserver' (1001) with group \`sdtdserver' ...
Creating home directory \`/home/sdtdserver' ...
Copying files from \`/etc/skel' ...
Enter new UNIX password:
Retype new UNIX password:
passwd: password updated successfully
Changing the user information for sdtdserver
Enter the new value, or press ENTER for the default
        Full Name \[\]:
        Room Number \[\]:
        Work Phone \[\]:
        Home Phone \[\]:
        Other \[\]:
Is the information correct? \[Y/n\]
dobriyded@server7dt:~$
At second line we can see first password request (can be asked or not asked) looks like [sudo] password for dobriyded
Its password request for main user with all privileges, we created firsts, during OS install ("dobriyded")
Second password request (Enter new UNIX password:) is for new user we creating , named "sdtdserver"
Now we switching user to newly created to continue installation. Command: su - sdtdserver
dobriyded@server7dt:~$ su - sdtdserver
Password:  *********
sdtdserver@server7dt:~$
We need to enter password for new user sdtdserver.
Please take a note, command prompt changes from "dobriyded@server7dt:~$" to "sdtdserver@server7dt:~$") to reflect another user become active now
From now on, every time you login to gameserver using SSH to start/stop/update/check alerts or logs etc, newly created username must be used! At first login prompt, use sdtdserver username and appropriate password. DO NOT use dobriyded user
# Installing LinuxGSM
And now we will install managing scripts by command wget -O linuxgsm.sh https://linuxgsm.sh && chmod +x linuxgsm.sh && bash linuxgsm.sh sdtdserver
example:
sdtdserver@server7dt:~$ wget -O linuxgsm.sh https://linuxgsm.sh && chmod +x linuxgsm.sh && bash linuxgsm.sh sdtdserver
--2018-12-02 23:03:29--  https://linuxgsm.sh/
Resolving linuxgsm.sh (linuxgsm.sh)... 104.28.4.112, 104.28.5.112, 2606:4700:30::681c:470, ...
Connecting to linuxgsm.sh (linuxgsm.sh)|104.28.4.112|:443... connected.
HTTP request sent, awaiting response... 301 Moved Permanently
Location: https://raw.githubusercontent.com/GameServerManagers/LinuxGSM/master/linuxgsm.sh \[following\]
--2018-12-02 23:03:29--  https://raw.githubusercontent.com/GameServerManagers/LinuxGSM/master/linuxgsm.sh
Resolving raw.githubusercontent.com (raw.githubusercontent.com)... 151.101.36.133
Connecting to raw.githubusercontent.com (raw.githubusercontent.com)|151.101.36.133|:443... connected.
HTTP request sent, awaiting response... 200 OK
Length: 11719 (11K) \[text/plain\]
Saving to: 'linuxgsm.sh'

linuxgsm.sh                      100%\[=========================================================>\]  11.44K  --.-KB/s    in 0.004s

2018-12-02 23:03:30 (2.97 MB/s) - 'linuxgsm.sh' saved \[11719/11719\]

    fetching serverlist.csv...OK
Installed 7 Days to Die server as sdtdserver

./sdtdserver install

sdtdserver@server7dt:~$
Now we have LinuxGSM scripts installed and our server tasks become almost automated.
Lets install gameserver files. Command: ./sdtdserver install
And yes, command starts from the dot (".")
sdtdserver@server7d:~$ ./sdtdserver install
    fetching core\_functions.sh...OK
    fetching core\_legacy.sh...OK
    fetching core\_messages.sh...OK
    fetching core\_dl.sh...OK
    fetching core\_trap.sh...OK
    fetching \_default.cfg...OK
    copying \_default.cfg...OK
    fetching common.cfg...OK
    fetching sdtdserver.cfg...OK
    fetching linuxgsm.sh...OK
    fetching core\_getopt.sh...OK
    fetching command\_install.sh...OK
    fetching check.sh...OK
    fetching check\_tmuxception.sh...OK
    fetching check\_permissions.sh...OK
    fetching check\_glibc.sh...OK
    fetching info\_glibc.sh...OK
    fetching info\_distro.sh...OK
    fetching check\_system\_requirements.sh...OK
    fetching install\_header.sh...OK
=================================
LinuxGSM - 7 Days To Die
by Daniel Gibbs
Website: https://linuxgsm.com
Contributors: https://linuxgsm.com/contrib
Donate: https://linuxgsm.com/donate
=================================
    fetching install\_server\_dir.sh...OK

Server Directory
=================================
/home/sdtdserver

Continue? \[Y/n\] Y
Lets check the home dir (/home/sdtdserver) is right and press "enter "
This is relatively long process. Remember, its possible to scroll terminal window up and down with mouse wheel, to show text you did not have time to read
Lets check all steps of install process
# Install troubleshooting
This block reflects log directory creation. It's fairly easy. Every string must finish with OK
mkdir: created directory '/home/sdtdserver/serverfiles'
    fetching install\_logs.sh...OK

Creating log directories
=================================
installing log dir: /home/sdtdserver/log...OK
installing LinuxGSM log dir: /home/sdtdserver/log/script...OK
creating LinuxGSM log: /home/sdtdserver/log/script/sdtdserver-script.log...OK
installing console log dir: /home/sdtdserver/log/console...OK
creating console log: /home/sdtdserver/log/console/sdtdserver-console.log...OK
installing game log dir: /home/sdtdserver/log/server...OK
    fetching check\_deps.sh...OK
Then, checking dependencies and prerequisites
Checking Dependencies
=================================
tmux
wget
ca-certificates
file
bsdmainutils
util-linux
python
bzip2
gzip
unzip
binutils
bc
jq
lib32gcc1
libstdc++6:i386
telnet
expect
Information! Required dependencies already installed
If all are green, skip to next step. Any red-colored line means you did not installed needed module in "Install all prerequisites " block earlier. System will try to install needed files, but fails for sure. User "sdtdserver" have no rights to install packages. Process of "repairing" such failure will be described later (i hope)
Next block - **SteamCMD installs and updates **
    fetching install\_steamcmd.sh...OK

Installing SteamCMD
=================================
    fetching check\_steamcmd.sh...OK
mkdir: created directory '/home/sdtdserver/steamcmd'
############################################################################################################################# 100.0%
OK
extracting steamcmd\_linux.tar.gz...OK
    fetching install\_server\_files.sh...OK

Installing 7 Days To Die Server
=================================
Redirecting stderr to '/home/sdtdserver/Steam/logs/stderr.txt'
ILocalize::AddFile() failed to load file "public/steambootstrapper\_english.txt".
\[  0%\] Checking for available update...
\[----\] Downloading update (0 of 13,269 KB)...
\[  0%\] Downloading update (25 of 13,269 KB)...
\[  0%\] Downloading update (154 of 13,269 KB)...
\[  1%\] Downloading update (471 of 13,269 KB)...
\[  3%\] Downloading update (978 of 13,269 KB)...
\[  7%\] Downloading update (2,402 of 13,269 KB)...
\[ 18%\] Downloading update (4,167 of 13,269 KB)...
\[ 31%\] Downloading update (5,997 of 13,269 KB)...
\[ 45%\] Downloading update (7,258 of 13,269 KB)...
\[ 54%\] Downloading update (8,587 of 13,269 KB)...
\[ 64%\] Downloading update (9,844 of 13,269 KB)...
\[ 74%\] Downloading update (11,106 of 13,269 KB)...
\[ 83%\] Downloading update (12,493 of 13,269 KB)...
\[ 94%\] Downloading update (13,269 of 13,269 KB)...
\[100%\] Download Complete.
\[----\] Applying update...
\[----\] Extracting package...
\[----\] Extracting package...
\[----\] Extracting package...
\[----\] Installing update...
\[----\] Installing update...
\[----\] Installing update...
\[----\] Installing update...
\[----\] Cleaning up...
\[----\] Update complete, launching...
Redirecting stderr to '/home/sdtdserver/Steam/logs/stderr.txt'
\[  0%\] Checking for available updates...
\[----\] Verifying installation...
We can see it installs correctly. Downloading update finished successfully.
Next step is running SteamCMD to **download 7DTD dedicated server files **
Steam Console Client (c) Valve Corporation
-- type 'quit' to exit --
Loading Steam API...OK.

Connecting anonymously to Steam Public...Logged in OK
Waiting for user info...OK
 Update state (0x3) reconfiguring, progress: 0.00 (0 / 0)
 Update state (0x61) downloading, progress: 0.00 (0 / 3459239207)
 Update state (0x61) downloading, progress: 0.33 (11534336 / 3459239207)
 \*\*\*\*\*\*\*\*\*\*\*\*\*\* LOT OF DATA CUT \*\*\*\*\*\*\*\*\*\*\*\*\*\*
 Update state (0x61) downloading, progress: 96.43 (3335852248 / 3459239207)
 Update state (0x61) downloading, progress: 99.07 (3427203485 / 3459239207)
Success! App '294420' fully installed.

Ok. APP is installed correctly. Hope, we have no errors

And final step: **confirmation**

\=================================
Was the install successful? \[Y/n\] Y
If you seen "Success! App '294420' fully installed" in previous block, press "enter" to let system to know everything is fine.
# Final stage
    fetching install\_config.sh...OK

Downloading 7 Days To Die Configs
=================================
default configs from https://github.com/GameServerManagers/Game-Server-Configs
    fetching serverconfig.xml...OK
copying serverconfig.xml config file.
'/home/sdtdserver/lgsm/config-default/config-game/serverconfig.xml' -> '/home/sdtdserver/serverfiles/sdtdserver.xml'
changing hostname.
changing rcon/admin password.
    fetching fix.sh...OK

Applying Post-Install Fixes
=================================
Information! No fixes required.
    fetching install\_complete.sh...OK
=================================
Install Complete!

To start server type:
./sdtdserver start

    fetching core\_exit.sh...OK
sdtdserver@server7dt:~$
Configs file are created, system is ready to run.
# Network configuration
WARNING
Network configuration is most troubled part for new gameserver owners. You can pass this section with ease or can stuck forever. Most people abandon the idea of creating their own server because of the inability to properly configure the network and begins to consider the word "port forwarding" offensive !
# Port forwarding
Port forwarding (opens new window) in a router of your server network, needs to be configured to allow peoples from outside of your LAN to access some gameserver ports, required to connect. It involves NAT (opens new window) and FIREWALL (opens new window) configuration of your router. This procedure is different for each router model and cannot be briefly described in this article.
You need to read the router manual and configure it as follows :
| Port | Type | Comment |
|---|---|---|
| 26900 | TCP | Connection port |
| 26900-26902 | UDP | Gameplay ports |
| 8082 | TCP | If you are using CSMM or Alloc's mod web map |
| ???? | If you plan to manage your server remotely from outside by using SSH without VPN. Use any allowed WAN port to hide SSH connection port from unwanted attention |
If you plan to manage your server remotely from outside by using SSH without VPN.
Use any allowed WAN port to hide SSH connection port from unwanted attention
The default port configuration is assumed! Port numbers can be changed in the configuration .XML file with the appropriate changes to the port forwarding table above.
It's not recommended and totally insecure to port forward telnet and webconsole ports (8080, 8081)
This section from official manual can help you https://developer.valvesoftware.com/wiki/7_Days_to_Die_Dedicated_Server#Port_Forwarding (opens new window)
But be warned! Its for A16, not A17 version
# Router firewall
After ports are opened in previous chapter, you need to configure router firewall to allow connection from outside.
# Server firewall
By default server firewall is disabled. You can enable it and configure it for additional security, but this section is not covered here and should be studied on your own.
# Traffic prioritization
To increase gameplay stability, it's wise to give a traffic to/from server a high priority.
Please check your router manual for instruction
# First time server start
Remember to login with user sdtdserver to perform any action with server (start/stop/update etc.)
Command prompt should looks like sdtdserver@server7d:~$ . If you see another username instead of sdtdserver, change active user by issuing command su - sdtdserver
# Switch to X64 version
In some cases, steamcmd cannot recognize you'r have x64 processor and starts x32 version of gameserver
It can lead to memory issues very soon. Dont skip this section!
Enter command as sdtdserver user: nano /home/sdtdserver/lgsm/config-lgsm/sdtdserver/sdtdserver.cfg
CFG file will be opened in text editor. It should looks like this
##################################
######## Instance Settings ########
##################################
# PLACE INSTANCE SETTINGS HERE
## These settings will apply to a specific instance
If you see empty file, exit (press ctrl-x) and double check file name and path!
Carefully edit this file to add 2 lines on the bottom and make it looks like this:
##################################
######## Instance Settings ########
##################################
# PLACE INSTANCE SETTINGS HERE
## These settings will apply to a specific instance

executable="./7DaysToDieServer.x86\_64"
When file is edited, press CTRL-O (file name will be displayed at the lowest part of a screen.
File Name to Write: /home/sdtdserver/lgsm/config-lgsm/sdtdserver/sdtdserver.cfg
^G Get Help                     M-D DOS Format                  M-A Append                      M-B Backup File
^C Cancel                       M-M Mac Format                  M-P Prepend                     ^T To Files
Press "enter" to write
press CTRL-X to exit
# Starting server
Issue command ./sdtdserver start
example of FIRST start output
sdtdserver@server7dt:~$ ./sdtdserver start
    fetching command\_start.sh...OK
[ .... ] Starting sdtdserver:     fetching check\_root.sh...OK
    fetching check\_system\_dir.sh...OK
    fetching check\_executable.sh...OK
    fetching check\_logs.sh...OK
    fetching check\_config.sh...OK
    fetching check\_ip.sh...OK
    fetching info\_config.sh...OK
    fetching info\_parms.sh...OK
[ INFO ] Starting sdtdserver: Check IP: 192.168.9.44
    fetching check\_status.sh...OK
    fetching fix\_steamcmd.sh...OK
[  OK  ] Fix sdtdserver: Applying steamclient.so general fix: 7 Days To Die
    fetching logs.sh...OK
[  OK  ] Starting sdtdserver: LinuxGSM
During very 1-st run, script fetches all needed modules from the web. Next run there be much less data and it should looks like in example below
Example of NOT first start output
sdtdserver@server7dt:~$ ./sdtdserver start
[ INFO ] Starting sdtdserver: Check IP: 192.168.9.44
[  OK  ] Starting sdtdserver: LinuxGSM
sdtdserver@server7dt:~$
Server will start in the background. to chesk "whats goin on" you can run command ps -fax
sdtdserver@server7dt:~$ ps -fax
  PID TTY      STAT   TIME COMMAND
    2 ?        S      0:00 \[kthreadd\]
*********************** LOT OF DATA CUT ***********************
  947 ?        Ss     0:00 /usr/lib/postfix/sbin/master -w
  949 ?        S      0:00  \\\_ qmgr -l -t unix -u
 5758 ?        S      0:00  \\\_ pickup -l -t unix -u -c
 1232 ?        Ss     0:00 /lib/systemd/systemd --user
 1240 ?        S      0:00  \\\_ (sd-pam)
 3155 ?        S<Ls   0:00 /usr/bin/atop -R -w /var/log/atop/atop\_20181203 600
 3253 ?        S<     0:00 /usr/sbin/atopacctd
 9147 ?        Ss     0:00 tmux new-session -d -x 23 -y 80 -s sdtdserver ./7DaysToDieServer.x86 -logfile /home/sdtdserver/log/serve
 9148 pts/1    Rsl+   0:09  \\\_ ./7DaysToDieServer.x86\_64 -logfile /home/sdtdserver/log/server/output\_log\_\_2018-12-03\_\_09-42-08.txt -qu
 9170 ?        S      0:00  \\\_ cat
As you can see from the example above, process with PID 9148 running in tmux session with "7DaysToDieServer.x86_64" executable and sending log output to /home/sdtdserver/log/server/output_log2018-12-0309-42-08.txt file
If you see ./7DaysToDieServer.x86 instead of ./7DaysToDieServer.x86_64 this is very bad, and you need to go back to the top of the page and carefully repeat 'Switch to X64 version' step
# Connecting from LAN
Its time to check our server.
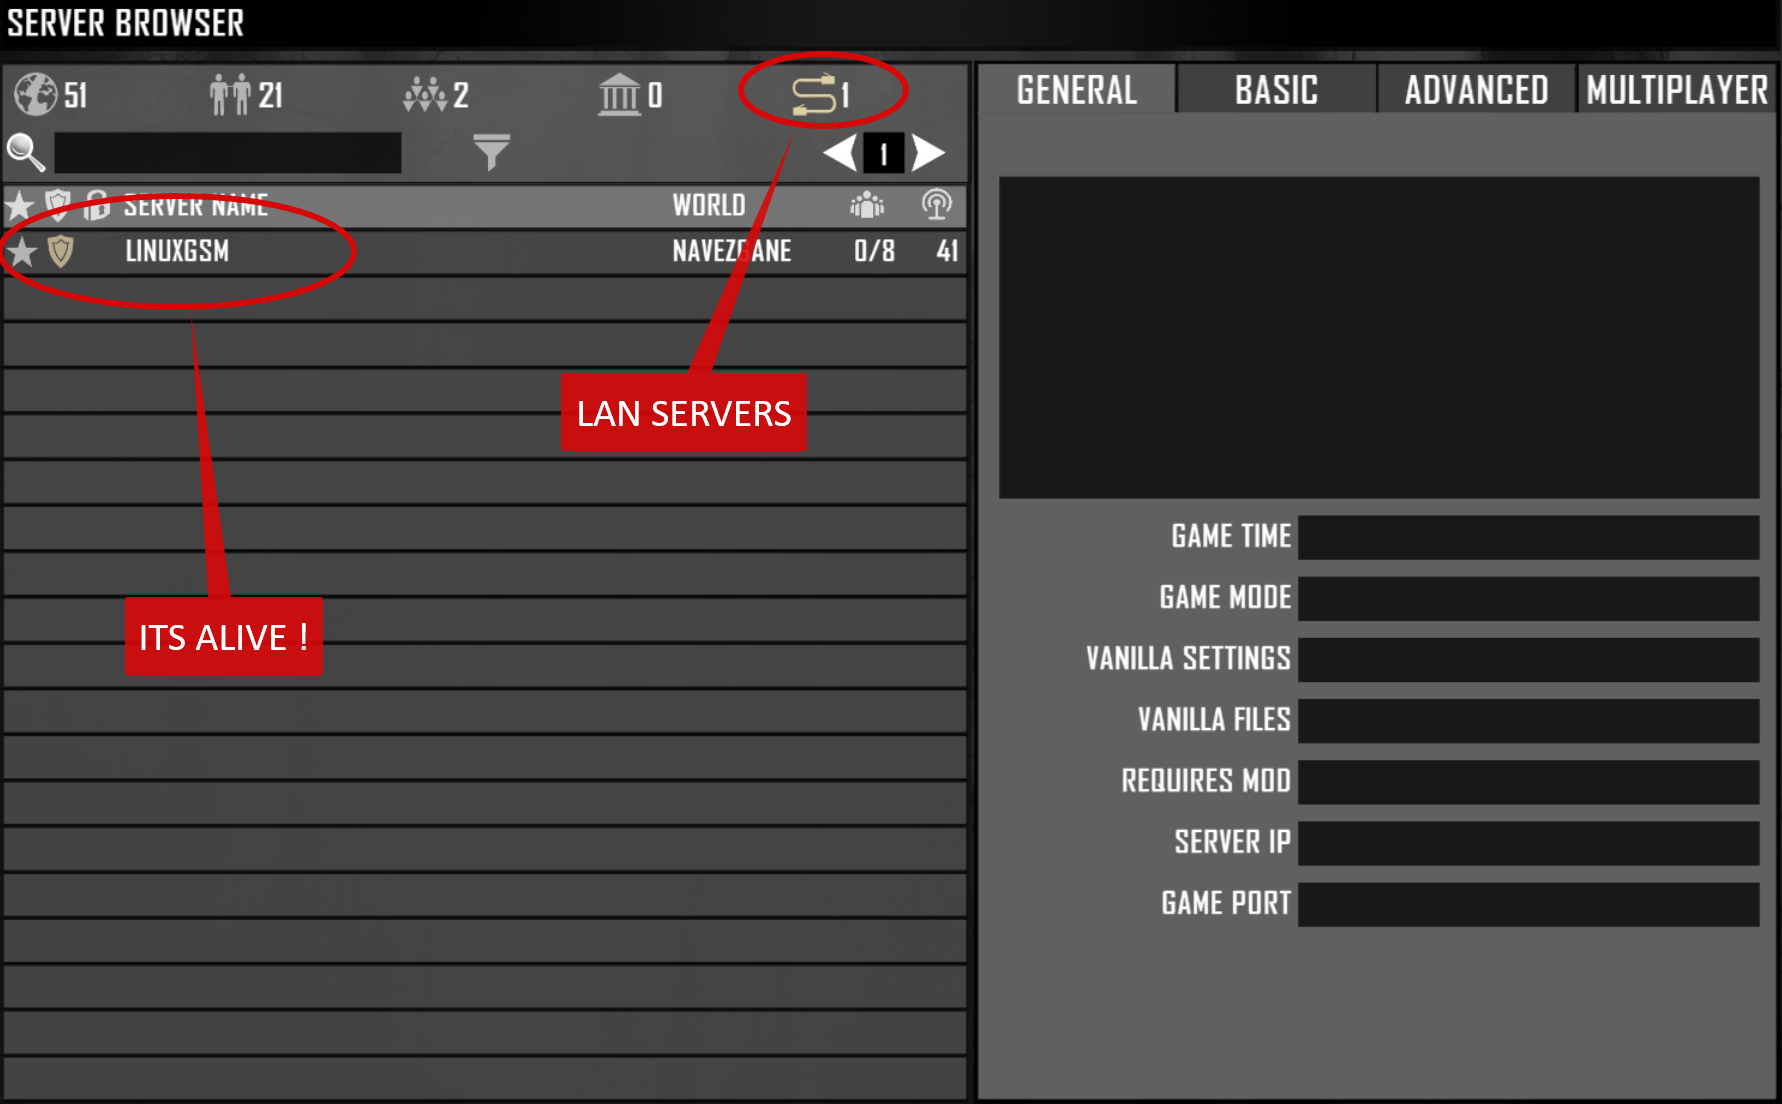
Start '7 Days To Die' game on your main PC and select "connect to server", then choose local (LAN) servers. Server should appear here in 2-3 minutes after start command
Try connecting to make sure server is working normaly and accept players.
Exit game and stop the server by issuing command ./sdtdserver stop
sdtdserver@server7dt:~$ ./sdtdserver stop
[ INFO ] Stopping sdtdserver: Check IP: 192.168.9.44
[  OK  ] Stopping sdtdserver: Graceful: telnet: 127.0.0.1: OK
[  OK  ] Stopping sdtdserver: LinuxGSM
sdtdserver@server7dt:~$
To connect successfully, game version of 7DTD on a PC, you are connecting from, must be equal to version on gameserver!
# Stop server
Stop gameserver by issuing command ./sdtdserver stop
sdtdserver@server7dt:~$ ./sdtdserver stop
[ INFO ] Stopping sdtdserver: Check IP: 192.168.9.44
[  OK  ] Stopping sdtdserver: Graceful: telnet: 127.0.0.1: OK
[  OK  ] Stopping sdtdserver: LinuxGSM
sdtdserver@server7dt:~$