# Roles
Roles allow the server owner to create groups that players can be assigned to in order to utilize the various parts of the CSMM functionality. Roles can be used to grant or limit access to the CSMM Server Management UI, grant access to in-game custom commands, and even have special settings for features such as Earned Currency modifications and Allowed Teleports quantities. Each Role has a specific Name to identify it, and a numeric Level assigned to it, with the lowest number (zero) being the most-powerful and the highest number (user defined) being the least powerful.
Example Role structure:
| Role | Level |
|---|---|
| Owner | 0 |
| Admin | 5 |
| Mod | 10 |
| Donator | 100 |
| Player | 2000 |
It is recommended to leave space between each major Role type, for future use if you decide to add additional roles between existing ones. Using the table above, if 'Mod' had been 10 and 'Donator' had been 11, there would be no room between them to add a future role, such as 'Big Donator', so that you could prioritize those players who donate a large amount.
Players who join are automatically assigned the lowest ranking (i.e. largest number) Role automatically. You should ensure that you always have a Role for new players that has the minimum options set. For example, the 'Player' Role above might have no Currency modifiers or extra Teleports added. All new players will receive the 'Player' Role by default.
If you add a new Role below the lowest ranked role, only new Players will be automatically assigned to that role; existing players will remain in the role they were first auto-assigned to. For example, in the table above, if a player joins and is given the 'Player' rank, and then a new 'Newbie' rank is added at Level 2005, all new players will be assigned to 'Newbie', but all existing players will retain their 'Player' rank.
# Creating Roles
Roles are created via the CSMM Web UI.
- From the main CSMM page, expand the 'Your Servers' option in the left-side navigation panel.
- Click on the server that you want to modify.
- Click Settings.
- On the Settings page, expand the Permissions and Roles panel by clicking on it.
- To add a new role, click Create Role
- Enter a Name for the new role, such as 'Admin'.
- Enter a numeric Level for the new role, such as 10. Allowed numbers are from 0 to 9999, and the default value is 2000.
- Click Add.
- Complete the Editing Roles section below to assign permissions to the newly created role.
Repeat these steps as needed to create additional roles. Remember to leave space between each major role type so that you can add roles in the future without starting over.

# Editing and Deleting Roles
Editing an existing Role is necessary in order to change the Name, Level, and to initially set or change Permissions, Economic Multipliers, and the Allowed Teleports field.
- From the main CSMM page, expand the 'Your Servers' option in the left-side navigation panel.
- Click on the server that you want to modify.
- Click Settings.
- On the Settings page, expand the Permissions and Roles panel by clicking on it.
- Locate the Role you wish to modify, and click Edit.
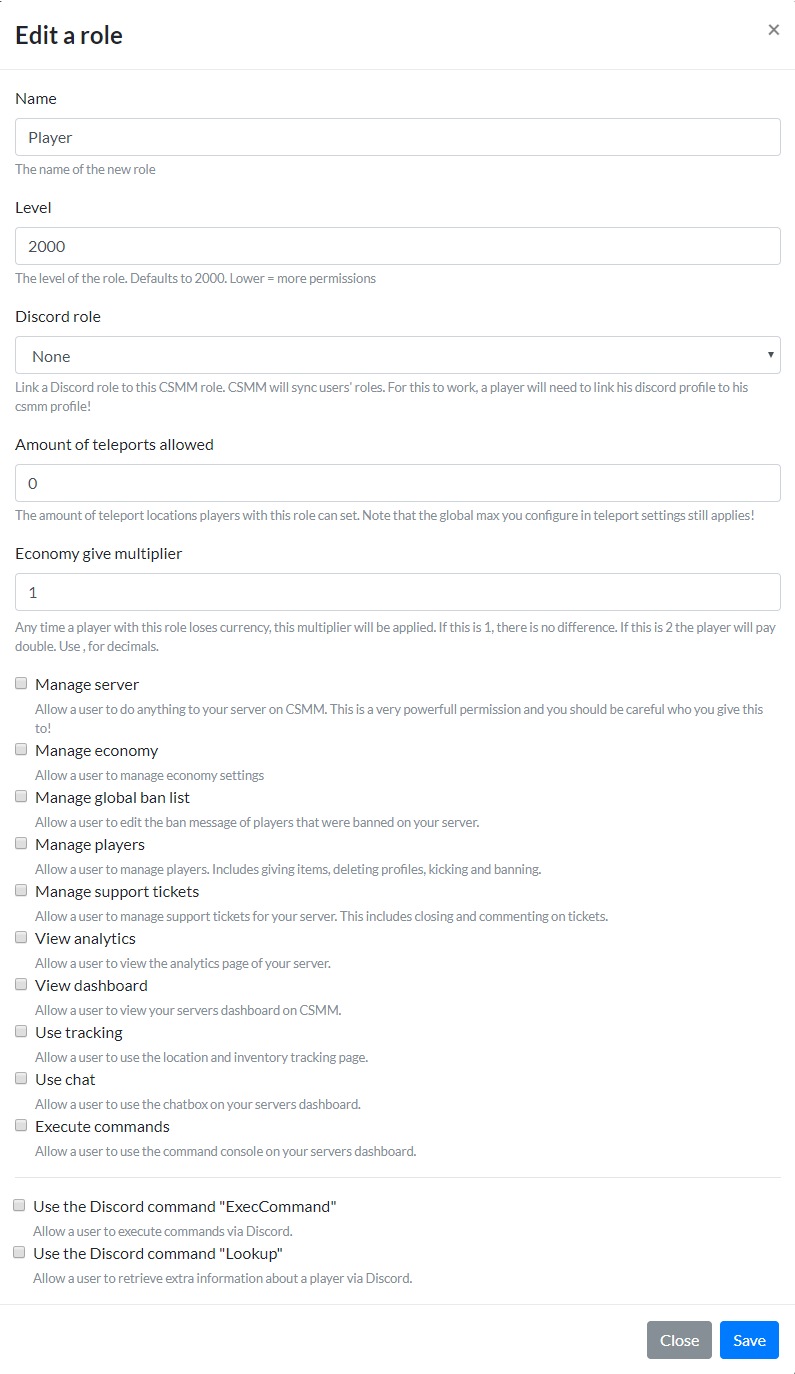
- Set the Role parameters as you wish.
- Settings and Multipliers
- Name - The display name of the Role.
- Level - The numeric permission number of the role. This does NOT relate to the in-game permission level for Admins and other Admin commands. Only to CSMM related features. You can, however, you the same numbers for both systems.
- Discord Role - If you have Discord Integration enabled, you can choose the Discord role that this role relates to. Anyone who has linked CSMM to their Discord profile and has this role in Discord will automatically receive the same role in CSMM. This is helpful for when the player data is wiped.
- Amount of Teleports Allowed - A custom value for choosing how many personal teleports a particular role can receive. This number can be any value, but if it exceeds the global max server reloads, the global number takes precedence.
- Economy Give Multiplier - Allows you to specify a percent multiplier for when the player earns currency from the economy. This applies to playtime earnings as well as zombie kills. '1' is the default (100%) multiplier, but higher and lower numbers can both be used.
- Economy Deduct Multiplier - Allows you to specify a percent multiplier for when the player spends currency, such as at the shop, or by using teleports or custom commands that are configured with a cost. Prices will still be the same, but the player will be deducted less or more currency depending on the multiplier. When a player with a 0.9 multiplier purchases an item that costs 100 coins, the player will be deducted only 90 coins. A player with a 1.1 multiplier would be deducted 110.
- CSMM Web UI Permissions
- Manage Server - Grants all the rights that the Owner of the server has. This is a very powerful role, and should be used sparingly.
- Manage Economy - Grants the ability to play with the economic configuration of the server, including management of the shop, and the ability to set and configure playtime/kill/Discord earnings.
- Manage Players - Grants the ability to view and modify all aspects of a player within CSMM, including kicks/bans, roles, economy balance, deleting their profile, and more.
- Manage Support Tickets - Grants the ability to see and interact with Support Tickets. Users can comment on and close tickets.
- View Analytics - Grants the ability to see the Server Analytics page, which includes data such as FPS and Player Count charts and graphs.
- View Dashboard - Grants the ability to see the Server Dashboard, including the Online Players table, the Server Stats panel, and the CSMM Map pane.
- Use Tracking - Grants the ability to use the Player Tracking and Inventory modules on various pages.
- Use Chat - Grants the ability for the user to chat directly with the in-game players via the web chat panel on the server dashboard. The chat window automatically tags the outgoing chat message with the player's name.
- Execute Commands - Grants the ability for the user to interact with the server console on the server dashboard.
- Discord Lookup - Grants the ability for the user to execute the 'lookup' command via the Discord bridge, allowing them to gather information about specific players.
- Settings and Multipliers
- Click Save.
To remove a Role entirely, repeat the above steps 1-4, but click Remove instead of _Edit. _If you remove a Role with players actively assigned to it, those players will no longer have a Role assigned. They do not automatically inherit Roles above or below the rank they lost.
# Assigning Roles
Once a Role has been created, it can be applied to one or more players via the CSMM Web UI.
- From the main CSMM page, expand the 'Your Servers' option in the left-side navigation panel.
- Click on the server that you want to modify.
- Click Players.
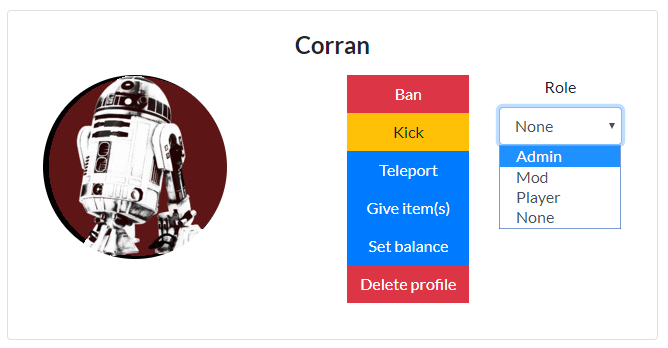
- Find the Player you want to modify and click on their name.
- On the Player Profile page, select the Role you want to use from the Role dropdown.
- Click Set.
Repeat these steps as necessary to assign roles to existing players.
Note: To remove a Role from a player, repeat the above steps, but set the Role field to 'None'.